To create a new QR code, go to the DASHBOARD and click + NEW QR CODE
Note: You need to have at least 1 project to create QR codes. When you first create your account, we've prepared one for you to try out and get started: "My Project" (see PROJECTS)
- Step 1: Give your code a name you'll remember so you can easily find it on your dashboard later on.
- Step 2: Select the language of your source text and paste the text you wish to translate into the text editor. You can add images simply by copying and pasting them into the editor.
- Step 3: Select the languages you want to translate to, and click TRANSLATE
Upon completing the steps above, QR Translator will:
• Instantly translate your content to your selected languages
• Add text to speech to each translation (see AUDIO)
• Create a single QR code ready for print (see DOWNLOAD)
Video: How to create a new QR code
A 14-day free trial period starts once the QR code is generated.
If you have a credit card registered, the QR code will automatically be activated after 14 days and you will be billed monthly (see Payments () for more information about pricing).
You can register your credit card in Payments
You can turn off the montly automatic renewal of the activation period from the DASHBOARD
If you have turned off automatic renewal and your QR code has expired, click the Activate button under the QR code's Activation Status to renew the activation period for another month.
Find the QR code you want to download on the DASHBOARD and click the icon.
Scroll down to the bottom of the page and find the "QR Code" panel.
You can also go to the QR Code panel directly from the DASHBOARD page by clicking the QR code's icon.
When downloading the QR code for production, make sure to select the "Live (for print)" code.
Click Download to download the QR code to your machine.
If you are not ready to publish your QR code, you can let others in your organisation preview its content with the QR Code under the "Draft" tab. Scans of the Draft code will not be included in the Scan Data.
You can change the width, color, background color, and file format (PNG or SVG) of your QR code. Click Apply to preview the changes before downloading.
You can:
• Edit your original text & all translations separately.
To start editing your content, go to the DASHBOARD, find the code you want to edit and click the icon.
- Step 1: In the Code Overview panel, scroll down to see an overview of all your code's translations.
- Step 2: Find the language you want to translate from and click the icon. This will open the text editor.
- Step 3 Use the text editor to edit the translation's content. You can use the controls in the text editor add images, videos, and styling.
- Step 4 Click Save draft to add your changes to the draft.
After saving, ADD / REDO TRANSLATIONS if necessary. - Step 5 When you are done editing, click Publish to QR code to immediately publish the changes, or click Save draft to save your edits to a draft.
*Note that your edits in one translation will not automatically be reflected on the other translations. This allows you to customize content according to the language audience.
If you want to make sure all languages have the same information, you will probably want to redo the existing translations (see TRANSLATE).
Next steps:
• Add / Redo / Delete translations (see TRANSLATE)
• Edit audio (see AUDIO)
How to insert images
How to add links
How insert a YouTube video
How to add a Google Map
Once you have created a QR code, you can:
• Add translations
• Redo (regenerate) existing translations
• Delete translations
To manage your translations, go to DASHBOARD, find the code you want to edit and click the icon to see an overview of the QR code's translations in the "Code Overview" panel. One QR code can contain up to 15 languages (including your source language).
- Step 1: In the Code Overview panel, scroll down to see an overview of all your code's translations.
- Step 2: Find the button next to Languages.
- Step 3: In the Add / Redo Translations panel, you will have a couple of options:
- Translate from: Choose which language you want to use as the source text for the translation.
- Use glossary: This option will appear if you have at least one term in your glossary (see 3. Glossary) on this page.
- Add : Select the languages you want to add to your code.
- Redo : The languages for which the code already has translations are listed here. Select the languages you wish to regenerate based on the selected source language*.
- Step 5:
Click Translate to generate the translations and save them to the new draft.
Click Publish to QR code when you are ready to push the new translations to your live QR code.
*Tip: To allow for custom content in each language, existing translations are not automatically regenerated. If you want all translations to have the same content, make sure to regenerate each language's translation each time you update your source text.
You can add more translation language options by adding custom languages.
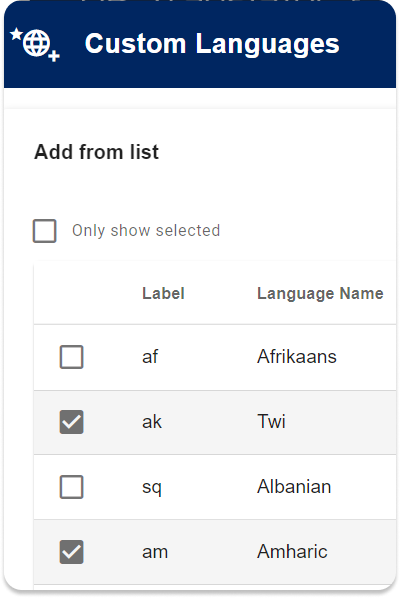
The easiest way to add custom languages is by selecting them from the ready-for-use list.
You can also define your own custom language if your preferred language is not on the list.
- Step 1: Go to the DASHBOARD and click on the
button to open the Custom Languages dialog.
You can access the same dialog from the "Add/Redo Translations" panel on the QR code's editing screen. - Step 2: Under "Add from list", simply tick the checkboxes of the languages you'd like to use. Default languages are shown in blue and cannot be switched off.
- Step 1: Go to the DASHBOARD and click on the
button to open the Custom Languages dialog.
You can access the same dialog from the "Add/Redo Translations" panel on the QR code's editing screen. - Step 2: Click the “Not in the list? Define your own custom languages” button to open the panel.
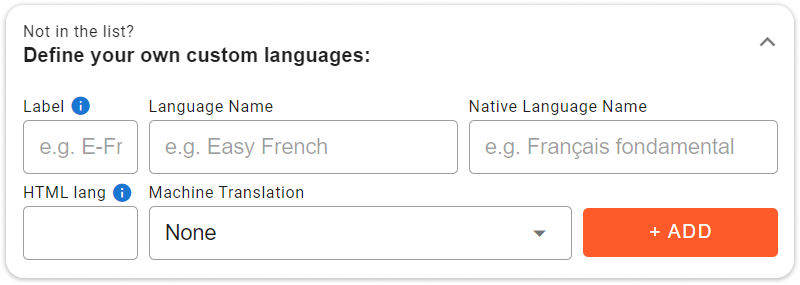
- Step 3: Fill out the required fields as follows:
- Label: Enter an abbreviation (max. 5 characters) which will serve as an identifier for the language on the QR code list on the dashboard. This label is visible only to you.
- Language Name: Enter the name of the language in your preferred language.
- Native Language Name: Enter the language name as it is known among its speakers. Visitors will see this in the language selection menu on the QR code.
- (Optional)HTML lang: This language code is used by browsers to recognise the language of the page. If the specified language corresponds to the user's browser language settings, QR Translator will automatically display the appropriate translation. To find out the appropiate language code, find the language's subtag on IANA's Language Subtag Registry.
- (Optional)Machine translation: Choose the machine translation language. If this field is left blank, translating to the new custom language will generate a blank canvas where you can insert your own translation.
- Step 4: Finally, click + ADD to save the new custom language. Your custom language is now ready for use.
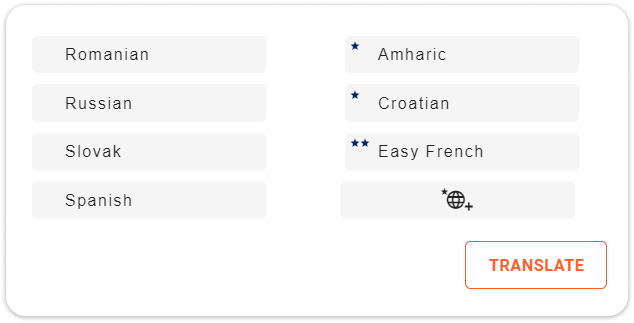
Once added, you can start adding translations in the new language to your QR codes just as you would with the default language options. Your custom languages will be distinguished with one star, or two stars if you've uniquely defined the custom language yourself:
Videos: How to create and use custom languages
1. Add custom languages from list
2. Add custom languages by defining your own
A glossary is a custom dictionary of frequently used words or phrases with their translations. You can use the glossary to specify how you want brand names or specific terminology to be translated in each language.
3.1 Setting up and editing a glossary- Step 1: Go to the DASHBOARD and click on the
button to open the Glossary dialog.
- Step 2: Click the to add more language columns to the glossary. We've already added a couple of languages to get you started.
- Step 3: Add new terms by filling out the translated terms in the bottom row (+ Add Term:) and clicking the button on the right.
- Step 4: Don't forget to click SAVE to save your changes.
- Optional: You can export all entries to a CSV file so you can edit the glossary offline on your PC.
- 1. Create a CSV template by first adding all necessary language columns. Download the template by clicking EXPORT CSV
- 2. Edit the CSV file on your PC. Please make sure to not change the language codes in the top row.
- 3. Upload the CSV file to the glossary by clicking IMPORT CSV
- Step 1: The next time you add translations to a QR code, simply check the
checkbox before clicking Translate
Video: How to use the glossary and back translation tools
- Step 1: In the Code Overview panel, scroll down to see an overview of all your code's translations.
- Step 2: Select the language(s) you want to delete and click the icon on the top left of the table. This will delete the translations from the current draft. To also delete the translations from the live QR code, click Publish to QR code
When you are done editing, click Publish to QR code to immediately publish the changes, or click Save draft to save your edits to a draft.
When you first create your QR code, an audio player with text-to-speech is generated for all supported languages.
You can customise the audio settings for your source text and each translation.
You can:
・ Show and hide the audio player
・ Choose a text-to-speech voice
・ Upload your own audio
To edit the audio settings, go to DASHBOARD, find the code you want to edit and click the icon.
In the Code Overview panel, scroll down to see an overview of all your code's translations and audio settings.
You can hide the audio player by toggling the button.
The audio player is shown on all translations by default, except when text-to-speech is unavailable in the translation's language.
You can select from a number of narration voices from the drop-down menu under Text to Speech / Upload Audio. You can test out the voices on the audio player located left from the voices menu.
You can upload your own audio by clicking the icon right from the text-to-speech voices menu.
You can customise the speed and tone of Text to Speech voices with SSML (Speech Synthesis Markup Language). QR Translator supports SSML files that are in accordance with Microsoft's guide to SSML:
https://learn.microsoft.com/en-us/azure/ai-services/speech-service/speech-synthesis-markup-structure
To upload an SSML file, open the advanced settings dialog by clicking the button.
Under Text to Speech, click the to open the file browser (CKfinder). Click "upload" and choose your SSML file. Once uploaded, the file will appear in the file browser: Double-click the file to select it.
When you are done editing, click Publish to QR code to immediately publish the changes, or click Save draft to save your edits to a draft.
With Projects, you can:
• Create different projects based on specific themes
• Share projects with other users and collaborate
• Control viewing and editing permissions
To create a new Project, click on the (Projects) button and click
Enter a name for your project and click + Create Project
Note: You can only invite other users to projects that you created.
- Step 1: Switch to the project you want to invite people to from the Projects dialog or from the dropdown menu.
- Step 2: Open the Project Members dialog by clicking the button.
- Step 3: Click the Invite button.
- Step 4: Enter the member's email address and click Send Invite. If your team member already has a QR Translator account, you can also use their username.
- QR Translator will send an email to the member's email address. Click the link in the email to join the project.
Note: Regardless of members permissions, only the project's owner can:
- invite members
- make payments and control subscriptions
- create new custom languages
- Step 1: Switch to the right project from the (Projects) dialog or from the dropdown menu.
- Step 2: Open the Project Members dialog by clicking the button.
- Step 3: Use the switch buttons to turn on/off permissions as needed.
- Global settings
- Can create new and delete QR codes.
- Can publish changes (new drafts) to the public QR code. - Visibility
- Can make QR codes public or private. - See scan data locations and insights
- Edit languages
- Can create translations and make changes to the audio and content in the languages selected.
- Can publish those changes provided "Global Settings" is also turned on. - Glossary
- Can edit the project's glossary in all languages.
Video: How to create and share projects
QR Translator's QR Codes contain a single URL (webpage). This URL contains your source text as well as all its translations.
The QR code is permanently linked to this URL: There is no need to reprint the code each time you update its content.
To create a new QR code, go to the DASHBOARD, click + NEW QR CODE and follow the steps on the screen. (see CREATE)
The URL stored in the QR code will open in the user's browser. If a translation in the user's language is available, that translation will be displayed automatically.
QR Translator detects the display language of the device used to scan the QR Code.
Yes. You can edit your QR code's content anytime. (see EDIT)
The QR code itself will remain the same, so there is no need to reprint the code after updating its content.
Yes. You can edit each translation separately, so you can edit the machine-generated translations or replace them entirely with your own.
Retranslating is optional. You only need to retranslate if you have edited the content in one language and want to have the same information in the other translations.
How to insert images
How to add links
How insert a YouTube video
How to add a Google Map
How to create a custom language 1: Add from list (machine translatable)
How to create a custom language 2: Define your own
How to create and share projects
How to use the glossary and back translation tools
How to redirect a QR code
Advanced tutorial: Distribute content across QR codes with sequential navigation